
Getting ready for a first hike is exciting. It can also get weirdly confusing fast.
Spend a little too long online, and a simple afternoon on the trail starts to look like a full-scale expedition. Suddenly there are endless gear lists, strong opinions, dramatic warnings, and enough product suggestions to make any beginner feel stuck before even leaving the driveway. 🥾
Let’s make this simpler.
This guide is a practical, beginner-friendly day hiking packing list for beginners built around the gear that actually matters. Not the fantasy version of hiking. Not the overloaded version. Just a smart, simple setup that helps keep a normal day hike safer, more comfortable, and a whole lot less stressful.
The easiest way to think about that setup is through the Ten Essentials. This is a long-used outdoor safety framework that helps hikers prepare for the most common problems: getting delayed, taking a wrong turn, running low on water, getting caught in weather, or ending up outside longer than planned.
That doesn’t mean every hike is dangerous. It means a little preparation goes a long way.
The Foundation: Understanding the Ten Essentials
The Ten Essentials aren’t really ten exact items. They’re ten systems that help cover the basics when the trail, the weather, or the day doesn’t go exactly the way you expected.
That matters more than many beginners realize. A trail described as “easy” can still feel very different once the sun gets hotter, the climb drags on, or the route gets less obvious than it looked on a screen. A quick hike can stretch into a long one. A dry forecast can turn into wind and drizzle. A small hot spot on your heel can become the thing that changes the entire afternoon.
Being prepared isn’t about expecting a crisis. It’s about building enough margin to stay calm and make good decisions if the day gets a little messy. 🌲
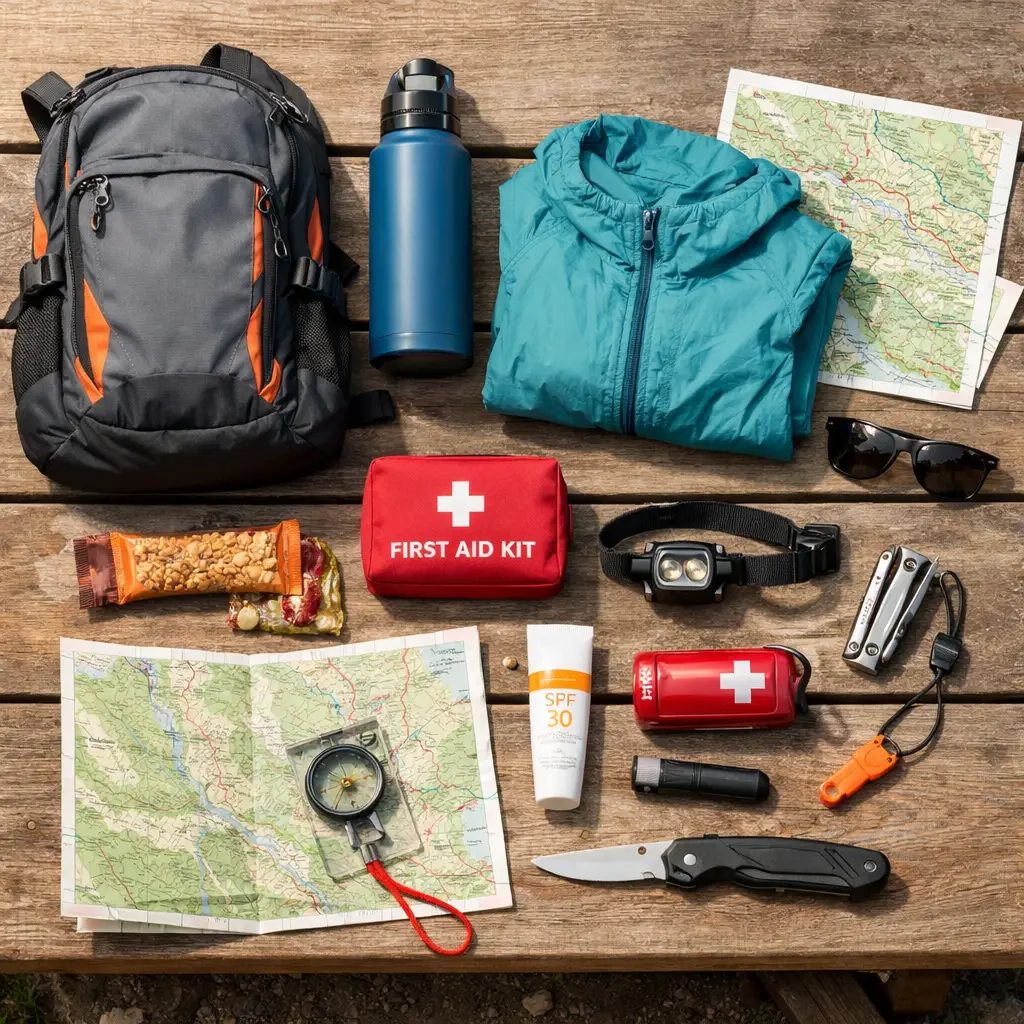
Here’s the modern take on the Ten Essentials, which this guide will break down one by one.
- Navigation: Map, compass, and/or GPS
- Illumination: Headlamp or flashlight
- Sun Protection: Sunscreen, sunglasses, hat
- First-Aid: A kit for minor injuries
- Knife/Multi-tool: For repairs and utility
- Fire: Lighter, waterproof matches, fire starter
- Shelter: Emergency blanket or bivy
- Extra Food: More than you think you’ll need
- Extra Water: More than you think you’ll need
- Extra Clothes: An insulation layer for when it gets cold
Let’s get into what each one actually looks like for a beginner day hiker.
The Ten Essentials: A Detailed Breakdown
1. Navigation: Know Where You Are and Where You’re Going
Getting off-route is one of the fastest ways a relaxing day hike starts to feel stressful.
Even on popular trails, intersections can be confusing. Signs can be faded or missing. Side paths can look like the main route. And while phones are incredibly useful, they’re still just one piece of the system. Batteries die. Screens crack. Cell service disappears. 🗺️
- Why It’s Essential: Trails don’t always stay obvious, especially when you’re tired, distracted, or moving faster than you should at a junction. A navigation system helps you stay oriented and get back safely.
- What to Pack:
- Phone App (with a backup): For many beginners on established trails, a GPS app is the easiest place to start. Apps like AllTrails or Gaia GPS let you download maps for offline use, which is important once you lose signal. Just remember: a downloaded map is only useful if the phone still has power.
- Paper Map & Compass: This is still the most dependable backup. It doesn’t care about batteries, service, or software problems. Full compass navigation can come later. For now, simply carrying a paper map of the area and a basic compass is a strong step in the right direction.
Beginner’s Takeaway: Start with a downloaded trail map, a fully charged phone, and a power bank. Add a simple paper map and compass to build a better backup system as your hikes get longer or more remote.
2. Illumination: See in the Dark
A headlamp isn’t just for sunrise starts or late-night hiking.
It’s for the very normal reality that hikes can take longer than expected. Maybe the trail is steeper than it looked online. Maybe breaks take longer. Maybe the route is rockier on the way down. However it happens, the last stretch of trail gets a lot harder when the light starts fading. 🌤️➡️🌙
- Why It’s Essential: A real light source helps prevent missteps, falls, rushed decisions, and the kind of sloppy movement that happens when people try to finish a hike too quickly in low light.
- What to Pack: A headlamp is the best option because it keeps both hands free. That matters on uneven ground, creek crossings, or any descent where balance matters.
- What to Look For:
- Lumens: Around 200–300 lumens is plenty for most day hiking situations.
- Batteries: Rechargeable models are convenient. AAA-powered models make it easy to carry spares.
- Red Light Mode: Nice to have for preserving night vision and keeping the light less harsh around other people.
Beginner’s Takeaway: A simple, dependable headlamp from a trusted brand like Petzl or Black Diamond is one of the smartest small purchases a new hiker can make. Check the battery before every hike, not at the trailhead.
3. Sun Protection: Your Shield Against the Elements
Sun exposure is easy to underestimate on the trail.
Cool temperatures can make it feel like the sun isn’t a big deal. But open ridgelines, reflected light off rock or water, and hours of steady exposure add up quickly. By the time you notice it, the headache, fatigue, or sunburn has already started to creep in. 😎
- Why It’s Essential: Sun protection helps reduce sunburn, eye strain, overheating, dehydration, and the kind of slow energy drain that makes a hike feel harder than it should.
- What to Pack: Think of this as a simple system rather than one single item.
- Sunscreen: Broad-spectrum with at least SPF 30. Apply it before you start and reapply during longer hikes.
- Sunglasses: Choose a pair that blocks UV-A and UV-B rays.
- Hat: A wide-brim hat gives the best coverage, but even a regular cap helps.
- UPF Clothing (Optional): Lightweight sun shirts and hoodies can make a huge difference on exposed trails.
Beginner’s Takeaway: Sunscreen, sunglasses, and a hat should be routine trail gear, not optional extras you only bring on especially hot days.
4. First-Aid Kit: For Blisters and Bumps
A day-hike first-aid kit doesn’t need to be big. It just needs to be useful.
Most trail issues are small at first: a hot spot on your heel, a scraped knuckle, a bug bite, a headache, a minor twist. The problem is that little issues can grow fast when you’re still miles from the car. A small blister at mile two can become the thing you remember most about the entire hike. 🩹
- Why It’s Essential: It helps you deal with common trail problems early, before they become hike-ending problems.
- What to Pack: You can buy a compact, pre-made hiking first-aid kit or build your own. Your kit should contain:
- Blister Care: Moleskin or other blister dressings are easily the most valuable part of a beginner trail kit.
- Adhesive Bandages: Various sizes.
- Antiseptic Wipes: To clean scrapes.
- Gauze Pads & Medical Tape: For larger wounds.
- Pain Relievers: Ibuprofen or acetaminophen.
- Antihistamines: For allergic reactions to bug bites or plants.
Beginner’s Takeaway: A compact pre-made option like the Adventure Medical Kits Ultralight/Watertight .5 is a strong starting point. Refill anything you use and check expiration dates every season.
5. Knife or Multi-tool: The Ultimate Utility Player
This isn’t about carrying something oversized or tactical-looking.
For day hiking, a knife or multi-tool is mostly about small practical tasks: cutting tape, trimming moleskin, opening food packaging, repairing gear, or handling the little annoyances that pop up outside. In real use, simple usually beats elaborate. 🔧
- Why It’s Essential: Useful for basic repairs, food prep, first aid, and general trail problem-solving.
- What to Pack: A small pocket knife or a lightweight multi-tool.
- What to Look For: A basic Swiss Army Knife is plenty for most beginners. A lightweight multi-tool like the Leatherman Skeletool adds pliers, which can be handy, but you still don’t need anything huge or heavy.
Beginner’s Takeaway: A small tool with a blade, scissors, and tweezers covers most beginner needs. The best trail tool is usually the one you’ll actually carry every time.
6. Fire: Your Emergency Warmth
This one can feel a little dramatic for a normal day hike. It’s still worth packing.
The point isn’t to plan on building a campfire at lunch. The point is that if something goes really sideways—an injury, an unexpected overnight, a long wait for help—warmth and the ability to start a fire can matter a lot.
- Why It’s Essential: In a real emergency, fire can provide warmth, light, and a way to signal for help.
- What to Pack: Two reliable fire sources. Redundancy matters here.
- A simple disposable lighter
- Waterproof matches in a waterproof container
- A small fire starter: Cotton balls with petroleum jelly or a commercial fire starter both work well and take up very little space.
Beginner’s Takeaway: Pack a lighter and waterproof matches. They weigh almost nothing, and they’re the kind of backup gear you’ll be glad to have if the day gets unexpectedly cold or complicated. Always follow local fire rules and restrictions.
7. Emergency Shelter: Protection from the Unexpected
No, this doesn’t mean carrying a full tent on a day hike.
It means carrying something small that can help protect you from wind, rain, and rapid heat loss if you have to stop moving or spend far longer outside than expected. This is one of those pieces of gear that feels unnecessary—right up until the moment it doesn’t. 🌧️
- Why It’s Essential: Wind and wet conditions can strip body heat fast, especially if you’re injured, exhausted, or waiting in one place.
- What to Pack: A lightweight emergency bivy or space blanket.
- What to Look For: Mylar emergency blankets are cheap, tiny, and better than nothing. Emergency bivies are usually a better upgrade because they wrap around the body more effectively and tend to be easier to manage in wind.
Beginner’s Takeaway: A basic emergency shelter item is lightweight insurance. It won’t take up much room, and it adds an important layer of protection if a hike stops being routine.
8. Extra Food: Fuel for the Journey
One of the most common beginner mistakes is packing food for the ideal version of the hike.
The ideal version is the one where everything runs on schedule, no one takes a wrong turn, nobody gets extra hungry, and the trail feels exactly like it looked online. Real hikes don’t always cooperate. A little extra food is less about convenience and more about margin. 🍎
- Why It’s Essential: Food helps keep energy, mood, and decision-making steady. If the hike runs long, that extra snack starts feeling a lot less optional.
- What to Pack: Easy, durable snacks that travel well:
- Energy bars
- Trail mix
- Nuts
- Dried fruit
- Jerky
- A sandwich or wrap for longer hikes
Beginner’s Takeaway: Bring at least one extra snack beyond what you expect to eat. Think of it as backup fuel, not overpacking.
9. Extra Water: The Most Important Essential
If there’s one area beginners tend to misjudge, it’s water.
Running out of snacks is frustrating. Running low on water is different. Dehydration can make you sluggish, foggy, irritable, dizzy, and much more likely to make poor decisions. It also makes the trail feel a whole lot longer. 💧
- Why It’s Essential: Water supports everything your body is trying to do on the trail, especially when you’re climbing, sweating, or hiking in dry or hot conditions.
- How Much to Pack: A general rule is about half a liter (16 oz) per hour of moderate hiking in moderate temperatures. Bring more in heat, dry climates, high exposure, or on tougher trails. Always err on the side of extra.
- How to Carry It:
- Water Bottles: Simple, durable, and easy to monitor.
- Hydration Reservoir (Bladder): Convenient for sipping frequently without stopping.
- Water Treatment: For longer hikes or as an emergency backup, a lightweight filter like the Sawyer Squeeze makes it possible to refill safely from natural water sources.
Beginner’s Takeaway: Two 1-liter bottles are a strong starting point for many hikes. It’s much better to finish with extra water than to spend the last hour wishing you had packed more.
10. Extra Clothes: Prepare for a Change in Weather
Weather shifts fast outdoors, especially with elevation, wind, shade, and changing afternoon conditions.
A trailhead can feel warm and calm while the higher section of the route feels cold, damp, and breezy. That’s why extra clothing matters. Not because you’re trying to dress for every possible forecast, but because a couple of well-chosen layers can completely change how safe and comfortable the hike feels. 🧥
- Why It’s Essential: Extra layers help manage cold, wind, rain, and sudden temperature changes, all of which can become serious if you’re wet or forced to stop moving.
- What to Pack: This usually means one or two key backup layers, not a full clothing change.
- Insulating Layer: A fleece or lightweight puffy jacket.
- Rain Shell: A waterproof or weather-resistant jacket that also blocks wind.
- Extra Socks: Dry socks can make a huge difference if your feet get wet.
Beginner’s Takeaway: At minimum, pack a rain jacket and a warm mid-layer. And avoid cotton. It holds moisture, dries slowly, and becomes a real problem when temperatures drop.
Beyond the Essentials: Your Core Hiking Gear
The Ten Essentials cover what goes in the pack. But the pack itself, your shoes, and the clothes on your body matter just as much.
Good core gear doesn’t need to be fancy. It just needs to make the day feel easier instead of harder.
The Right Daypack
A good daypack should carry everything comfortably without tempting you to bring half your closet.
For most beginners, the sweet spot is a pack that’s large enough for water, layers, snacks, and safety gear, but still compact enough to stay streamlined on the trail. 🎒
- Capacity: Look for a pack between 18 and 30 liters. That range works well for most day hikes.
- Fit: Comfort matters more than extra features. Look for adjustable shoulder straps, a sternum strap, and a simple hip belt or waist strap to help stabilize the load.
- Features: Side water bottle pockets, a hydration sleeve, and a couple of smaller compartments for organization are all genuinely helpful. The REI Co-op Trail 25 is a practical, beginner-friendly option.
Your Hiking Footwear
Footwear can make or break a hike.
The goal isn’t to buy the “most serious” option. It’s to wear something comfortable, supportive, and grippy enough for the trail you’re actually doing.
- Hiking Boots: Durable, protective, and supportive on rough terrain. Great for rocky trails and people who like more structure, though they can feel heavier and warmer.
- Trail Running Shoes: Lightweight, breathable, and comfortable for many hikers right away. They’re especially popular for day hikes because they feel nimble and less bulky.
- Hiking Shoes: A nice middle ground between the two, with trail grip and structure but a lower cut than a boot.
Beginner’s Advice: Don’t show up in brand-new footwear for a long hike. Break shoes in first with neighborhood walks, errands, or shorter local trails. Pair them with good socks, ideally merino wool or synthetic, and you’ll avoid a lot of beginner foot problems before they start.
What to Wear: The Layering System
The simplest way to dress for hiking is in layers.
That gives you flexibility. You can cool down on climbs, warm up during breaks, and adjust as the weather changes instead of suffering through the whole hike dressed wrong. 👕➡️🧥
- Base Layer (Next to Skin): A moisture-wicking shirt made from synthetic fabric or merino wool.
- Mid-Layer (Insulation): A fleece or light puffy jacket for warmth.
- Shell Layer (Protection): A rain jacket or wind-blocking shell.
For bottoms, stick with hiking pants, shorts, or other quick-drying synthetic options. Leave jeans at home. They’re heavy when wet, slow to dry, and uncomfortable on trail.
The Complete Day Hiking Checklist for Beginners
Here it is, all in one place. Use this as your last-minute check before heading out.
| Category | Item | Notes |
|---|---|---|
| The Ten Essentials | ||
| Navigation | Phone with offline map, power bank, paper map | Know how to use them. |
| Illumination | Headlamp with fresh batteries | Check it before you leave. |
| Sun Protection | Sunscreen, sunglasses, hat | Apply sunscreen before you start. |
| First-Aid | Pre-made kit with blister care | Customize with your personal medications. |
| Knife/Tool | Small knife or multi-tool | Simple is best. |
| Fire | Lighter and waterproof matches | For emergencies only. |
| Shelter | Emergency bivy or blanket | Lightweight insurance. |
| Extra Food | One extra energy bar or snack | More than you plan to eat. |
| Extra Water | At least 1 liter more than you expect to drink | A water filter is a great backup. |
| Extra Clothes | Rain jacket and an insulating mid-layer | Avoid cotton. |
| Core Gear & Apparel | ||
| Backpack | 18-30L Daypack | Make sure it’s comfortable. |
| Footwear | Broken-in hiking shoes or trail runners | Don’t start a hike with new shoes. |
| Socks | Merino wool or synthetic hiking socks | No cotton socks! |
| Apparel | Wicking shirt, hiking pants/shorts | Dress in layers. |
| Optional but Nice | ||
| Trekking poles | Saves your knees on downhills. | |
| Sit pad | A small luxury for breaks. | |
| Bug spray / Headnet | Season and location dependent. | |
| Wallet, ID, and some cash | ||
| Keys |
Final Thoughts: Start Small, Hike Smart
This list can look long on paper, but in real life, it quickly becomes a simple routine.
Once you gather the basics, you’ll have a reliable kit that can handle most beginner day hikes without a lot of second-guessing. And that’s really the goal here. Not to make hiking complicated. To make it easier to get outside with more confidence and fewer avoidable mistakes. 🌄
There’s no need to buy the most expensive version of everything. Focus on safety first, comfort second, and then upgrade over time based on the kind of hiking you actually enjoy.
Just as important as your gear: tell someone where you’re going, check the weather, know your turnaround time, and pick a trail that matches your current experience level. Those habits are part of the kit too.
A solid day hiking packing list for beginners gives you a better start, a safer day, and a much more enjoyable first experience on the trail. Pack smart, start small, and go enjoy the walk.
Frequently Asked Questions (FAQ)
Q: How much water should I actually bring for a day hike?
A: A good starting point is about half a liter (16 oz) per hour of hiking in moderate conditions. If the hike is hot, exposed, steep, or longer than expected, you’ll need more. For a 4-hour hike, carrying at least 2 liters is a smart baseline, and more may be better depending on the conditions.
Q: Do I really need hiking boots, or can I just wear sneakers?
A: For very smooth, easy trails, sturdy sneakers may be fine. But for most actual hiking trails with loose dirt, rocks, roots, or uneven footing, trail runners or hiking shoes are a much better choice. They offer better traction, durability, and trail-specific support.
Q: What size backpack is best for a beginner day hiker?
A: A pack in the 20–30 liter range is ideal for most beginners. It’s large enough for the Ten Essentials, extra water, snacks, and a layer or two, but not so large that it becomes bulky or encourages overpacking.
Q: What is the most common mistake beginner hikers make?
A: Underestimating the hike. That usually shows up as not bringing enough water, picking a trail that’s harder than expected, starting too late in the day, or wearing the wrong shoes and clothing. Small preparation mistakes tend to stack up quickly on the trail.
Affiliate Disclosure: GearForTheOutdoors.com participates in affiliate programs, including REI, Amazon, REI Outlet, Garage Grown Gear, evo, and other trusted partners. When you purchase through our links, we may earn a small commission at no extra cost to you. That helps support our content and keeps our recommendations useful, practical, and free.
Disclaimer: This post is for informational purposes only. Always verify current product details, fit, availability, safety information, and manufacturer warranties before purchase or use. Outdoor conditions and gear performance can vary depending on setup, weather, terrain, and experience level.