
A hammock underquilt keeps cold air from stealing heat beneath your hammock, where a sleeping bag alone often falls short. It hangs outside the hammock, allowing its insulation to stay lofted instead of being compressed under your body.
For most three-season hammock campers, a full-length underquilt rated around 20°F to 30°F is a practical starting point. A lighter 40°F model may be enough for mild summer nights, while backpackers can save weight with a shorter down underquilt and a small pad for their feet.
The right choice depends on how cold your trips get, how much weight you’re willing to carry, and whether comfort or packability matters most.
Here’s how to choose an underquilt that fits your hammock, your camping conditions, and your budget—without paying for insulation you don’t need.
What Is a Hammock Underquilt, and Why Do You Need One?
A hammock underquilt is an insulated blanket suspended beneath your hammock. Unlike a sleeping bag or sleeping pad, it hangs outside the hammock fabric, so your body weight doesn’t compress its insulation.
That difference is important.
When you sleep in a hammock, the insulation beneath your body gets compressed. Even a warm sleeping bag can leave your back and hips exposed to heat loss as cool air circulates underneath.
Hammock campers often call this uncomfortable sensation Cold Butt Syndrome.
An underquilt helps prevent it by creating an insulated barrier around the hammock’s underside.
A properly fitted underquilt provides three important benefits:
- Better warmth: Insulation stays lofted beneath your back, hips, and shoulders.
- More comfortable sleeping: You can lie diagonally without managing a bulky pad beneath your body.
- Consistent coverage: The quilt follows the hammock’s shape and helps reduce cold spots caused by moving air.
An underquilt doesn’t replace your sleeping bag or top quilt. It protects you from below, while your top insulation keeps you warm above.
Both parts of your sleep system need to match the temperatures you expect.
At What Temperature Do You Need a Hammock Underquilt?
There’s no exact temperature when everyone suddenly needs an underquilt.
Some campers begin feeling cold beneath their hammock around 60°F, particularly when there’s a breeze. Others may stay comfortable in warmer conditions with minimal insulation.
Your personal cold tolerance, clothing, wind exposure, and sleeping setup all affect the result.
Here are three practical examples:
Camping around 50°F: A 40°F underquilt can be a reasonable choice if you sleep warm and conditions are mild. Cold sleepers may appreciate additional insulation.
Camping around 30°F: A 20°F underquilt provides a useful temperature margin, especially when temperatures fluctuate or wind exposure is difficult to predict.
Camping near freezing or below: Choose insulation specifically suited to the conditions, including an adequately warm top quilt or sleeping bag. A reliable full-length underquilt becomes increasingly valuable.
The important distinction is that underquilt temperature ratings aren’t standardized across every manufacturer.
A quilt labeled 20°F isn’t automatically comfortable for every sleeper at that temperature.
When temperatures approach your underquilt’s advertised lower limit, leaving some insulation margin is usually more sensible than relying on the rating alone.
Hammock Underquilt vs. Sleeping Pad: Which Is Better?
You don’t necessarily need an underquilt to sleep warmly in a hammock.
An insulated sleeping pad can also provide bottom insulation, and it may be the more economical solution if you already own one.
However, the two approaches have different advantages.
| Feature | Hammock Underquilt | Sleeping Pad |
|---|---|---|
| Insulation position | Outside and beneath hammock | Inside hammock |
| Sleeping comfort | Preserves the natural hammock shape | Can shift or restrict movement |
| Side and shoulder coverage | Good when properly fitted | Depends on pad width and shape |
| Setup | Requires suspension adjustment | Simple placement, but may need repositioning |
| Versatility | Primarily hammock camping | Hammock and ground camping |
| Best for | Regular hammock camping | Occasional hammock use or mixed setups |
When a Sleeping Pad Makes More Sense
A sleeping pad is worth considering if you’re just getting started with hammock camping.
It lets you experiment without purchasing a separate insulation system.
It’s also useful when your trips alternate between sleeping in a hammock and sleeping on the ground.
The biggest drawback is positioning.
Traditional sleeping pads may slide sideways, fold beneath your shoulders, or interfere with the diagonal sleeping position that makes gathered-end hammocks comfortable.
Some hammocks solve this problem with dedicated pad sleeves or double-layer designs that hold a pad in place.
When an Underquilt Is Worth the Investment
If hammock camping is your preferred sleeping setup, an underquilt is generally the more comfortable long-term choice.
It eliminates the need to position a pad underneath your body and provides more consistent coverage as you change sleeping positions.
For regular spring and fall camping, those improvements can justify the additional expense.
The decision is simple: If you occasionally sleep in a hammock, start with the insulated pad you already own. If you camp in a hammock regularly, a properly fitted underquilt is usually worth considering.
How to Choose a Hammock Underquilt: Four Key Decisions
Choosing a hammock underquilt comes down to four factors: temperature rating, insulation type, coverage length, and hammock compatibility.
Getting those right matters far more than buying the lightest or most expensive model.
1. Choose the Right Temperature Rating
Temperature rating is usually the most important specification because it determines whether the underquilt can provide enough insulation for your planned trips.
Common ratings include 40°F, 30°F, 20°F, and 0°F.
| Underquilt rating | Typical use | Main consideration |
|---|---|---|
| 40°F (4°C) | Summer and mild shoulder-season nights | Lower weight and bulk, but limited cold-weather margin |
| 30°F (-1°C) | Cooler spring and fall camping | Useful balance between warmth and packability |
| 20°F (-7°C) | Three-season trips with chilly nights | More flexibility when overnight temperatures drop |
| 0°F (-18°C) | Dedicated winter camping | Greater insulation, weight, and packed volume |
These are general guidelines rather than guaranteed comfort temperatures.
For most campers who regularly spend nights outdoors from spring through fall, a 20°F underquilt is a versatile choice.
It offers additional insulation for unexpectedly chilly nights, and many designs allow you to loosen or partially vent the quilt when temperatures are warmer.
But if your trips rarely drop below 45°F or 50°F, a 40°F underquilt may be sufficient.
There’s little benefit in carrying a bulky winter quilt on every summer camping trip.
How Much Temperature Margin Do You Need?
Consider the coldest conditions you reasonably expect rather than the average temperature during your trip.
If overnight lows are likely to reach 35°F, a 40°F underquilt leaves very little margin.
A 20°F model is a more conservative choice, particularly if you sleep cold.
Similarly, someone who routinely camps around 20°F should be cautious about relying on a 20°F-rated quilt without considering how the manufacturer defines that rating.
Wind, moisture, quilt fit, and your top insulation all influence how warm the complete system feels.
Wind Exposure Matters More Than You Might Expect
A hammock is exposed to moving air beneath and around your body.
Even a well-insulated underquilt may feel colder if gaps allow air to circulate between the quilt and hammock.
Before buying a much warmer model, make sure your existing quilt is properly adjusted.
A well-pitched tarp can also reduce wind exposure. In particularly windy conditions, an underquilt protector may help prevent drafts.
2. Down vs. Synthetic Underquilts: Which Insulation Is Better?
Both down and synthetic underquilts can provide reliable warmth.
The biggest differences involve weight, packed size, moisture management, maintenance, and cost.
Down Underquilts: Best for Lightweight Backpacking
Down insulation uses clusters of duck or goose down to trap warm air.
Its biggest advantage is efficiency.
A well-designed down underquilt generally provides excellent insulation without requiring as much weight or packed volume as a comparable synthetic model.
That’s particularly useful for backpackers who need to carry their hammock, tarp, suspension, insulation, and other equipment over long distances.
Down quality is often described by fill power, such as 750, 850, or 950.
Higher fill power means a given weight of down can create more loft, potentially allowing a quilt to achieve similar warmth with less insulation weight.
However, fill power alone doesn’t determine warmth. The amount of down, quilt dimensions, baffle construction, and overall design also matter.
Advantages:
- Excellent warmth-to-weight ratio
- Compact packed size
- Suitable for backpacking and bikepacking
- Can maintain useful loft for many years with proper care
Limitations:
- Usually more expensive
- Loses significant insulating performance when saturated
- Requires careful cleaning, drying, and storage
Some manufacturers use water-resistant down treatments to improve moisture tolerance. These treatments can help, but they don’t make down waterproof.
Choose down if: You regularly carry your camping gear in a backpack and saving weight and space justifies the higher cost.
Synthetic Underquilts: Best for Value and Damp Conditions
Synthetic underquilts use man-made fibers, usually polyester, to trap warm air.
They generally cost less than comparable premium down quilts and retain more insulating ability when damp.
That makes them appealing for campers who prioritize affordability, easy maintenance, and moisture tolerance.
Advantages:
- Typically more affordable
- Better insulation retention when damp
- Often easier to maintain
- Practical for car camping and recreational use
Limitations:
- Usually heavier for comparable warmth
- Bulkier when packed
- Insulation can gradually lose loft through repeated compression
For car camping, the weight penalty may barely matter.
If you’re carrying your sleep system from your vehicle to a campsite a short distance away, a synthetic underquilt may offer all the warmth you need without the cost of premium down.
Choose synthetic if: You mainly camp near your vehicle, want to keep costs reasonable, or expect frequent damp conditions.
Down vs. Synthetic: Quick Comparison
| Feature | Down | Synthetic |
|---|---|---|
| Warmth-to-weight | Excellent | Good |
| Compressibility | Excellent | Moderate |
| Damp-weather insulation | Reduced significantly when wet | Generally better when damp |
| Upfront cost | Higher | Usually lower |
| Maintenance | More careful drying and storage | Generally easier |
| Best for backpacking | Yes | When weight is less critical |
| Best for car camping | Good, but often unnecessary expense | Excellent value |
Is Down Worth Paying More For?
That depends on how you camp.
Imagine two campers using equally warm underquilts.
One carries everything in a backpack for several miles. The other parks near a campsite and hangs a hammock between nearby trees.
For the backpacker, reducing weight and packed volume can make a noticeable difference over a long trip.
For the car camper, those advantages may provide little practical benefit.
The important question isn’t whether down is better. It’s whether down offers an advantage you’ll actually use.
For occasional hammock camping and car camping, synthetic insulation is often the better value. For frequent backpacking, down can be worth the investment.
3. Full-Length vs. Partial-Length Underquilts
Underquilts come in different lengths, and that choice directly affects both warmth and convenience.
A shorter quilt saves weight, but it also leaves part of your body without dedicated bottom insulation.
Full-Length Underquilts: Best for Comfort
A full-length underquilt is designed to provide insulation from your shoulders toward your feet.
For most recreational hammock campers, it’s the easiest option to live with.
You don’t need to position an additional foam pad under your lower legs, and you have more freedom to change positions without moving outside the insulated area.
Full-length underquilts are particularly useful for:
- Car camping
- Colder overnight temperatures
- Campers who move frequently while sleeping
- Anyone who prioritizes comfort over minimum pack weight
The main drawbacks are additional weight, packed volume, and potentially higher cost.
For most casual campers, those tradeoffs are reasonable.
Partial-Length Underquilts: Best for Saving Weight
Partial-length underquilts focus insulation around the torso and core.
Three-quarter-length models typically cover the shoulders through the knees or calves, depending on the design and your body size.
They’re popular with weight-conscious backpackers.
However, your lower legs and feet may need additional insulation.
A small closed-cell foam pad placed inside the hammock can provide that coverage. Some backpackers already carry a foam sit pad that can serve this second purpose.
The advantage is that you avoid carrying unnecessary insulation along the entire hammock.
The downside is another piece of gear to position correctly.
On warmer nights, that may not be a significant inconvenience. On a cold night when you’re shifting around in your hammock, maintaining full coverage can become more important.
Which Length Offers Better Value?
| Camping priority | Better choice | Why |
|---|---|---|
| Maximum sleeping comfort | Full-length | Less need for additional insulation |
| Cold-weather camping | Full-length | More complete coverage |
| Car camping | Full-length | Weight savings matter less |
| Ultralight backpacking | Partial-length | Reduces carried weight and bulk |
| Mild-weather backpacking | Partial-length | Less lower-body insulation may be sufficient |
| Simple, low-maintenance setup | Full-length | Easier to keep insulated areas covered |
For a first underquilt, full-length is generally the more forgiving choice.
Partial-length makes the most sense when you already understand your insulation needs and want to reduce pack weight.
4. Check Hammock Compatibility and Suspension
Many underquilts are designed for conventional gathered-end hammocks, but compatibility isn’t universal.
Hammock shape, width, suspension design, and sleeping position can all affect the fit.
Before buying, check:
- Hammock type: Gathered-end hammocks are often compatible with general-purpose underquilts. Bridge and spreader-bar hammocks may need specialized designs.
- Coverage dimensions: Make sure the quilt is long and wide enough for your body and preferred sleeping position.
- Attachment system: Confirm that the suspension connects securely to your hammock and includes the required hardware.
- End adjustments: Adjustable channels or tension controls can help reduce drafts around your shoulders and feet.
- Diagonal sleeping position: The quilt should remain positioned beneath your body when you lie diagonally.
Some quilts are designed to work especially well with particular hammock systems.
For example, the ENO Ember fits conventional ENO hammocks but isn’t compatible with the DayLoft or SuperNest models.
Dedicated systems may offer simpler installation, while more universal suspension designs provide greater flexibility across different hammocks.
Why Proper Suspension Adjustment Matters
An underquilt needs to follow the underside of your hammock without compressing the insulation.
Hang it too loosely, and cold air can circulate through gaps.
Pull it too tightly, and the insulation may flatten against the hammock.
A good fit keeps the quilt close enough to reduce unwanted airflow while preserving its insulating loft.
This is one reason a properly adjusted midrange underquilt can feel warmer than a more expensive model that’s poorly installed.
Best Hammock Underquilts for Different Camping Styles
The best hammock underquilt isn’t necessarily the warmest or lightest option.
It’s the one that provides enough insulation for your typical temperatures without adding unnecessary weight, cost, or setup complexity.
These three models address different needs: a budget-friendly synthetic underquilt for mild weather, a versatile down quilt for mixed camping setups, and a dedicated lightweight option for backpacking.
Hammock Underquilt Comparison
| Product | Insulation | Temperature | Weight | Coverage | Price tier |
|---|---|---|---|---|---|
| ENO Ember UnderQuilt | Synthetic | 40–60°F range | 27 oz | Full-body design | $ |
| Kammok Firebelly 30°F | 750-fill down | 30°F | 28.2 oz quilt only | Full-body convertible quilt | $$–$$$ |
| Enlightened Equipment Revolt V2 | 850/950-fill down | 0–50°F options | Varies by configuration | 55″ short or 80″ regular | $$$ |
Price tiers are relative rather than live prices. Weights reflect the stated product or quilt weight, not necessarily the complete packed system. Revolt V2 weight changes with temperature rating, length, and down selection.
ENO Ember UnderQuilt — Best for Beginners and Mild-Weather Camping

The ENO Ember UnderQuilt is an accessible option for hammock campers who want dedicated bottom insulation without paying for premium down.
It uses two layers of recycled polyester insulation with offset quilting to help maintain coverage.
Its specified temperature range is 40°F to 60°F, making it better suited to mild spring, summer, and early fall nights than cold-weather camping.
At 27 ounces, the Ember isn’t designed to compete with specialized ultralight quilts. But its adjustable suspension and synthetic insulation make it practical for occasional trips and car camping.
The Ember also fits most conventional ENO hammock models, although some specialty models are excluded.
Why it makes sense:
- Synthetic insulation keeps the price relatively approachable.
- Adjustable suspension simplifies positioning.
- Full-body coverage helps reduce the need for separate foot insulation.
- A practical choice for regular mild-weather camping.
What to consider: The Ember isn’t intended for freezing temperatures. If your camping regularly involves overnight lows around 30°F, a warmer quilt is a better investment.
Best for: Beginners, recreational hammock campers, and ENO owners who mainly camp in relatively mild weather.
Check the ENO Ember UnderQuilt
Kammok Firebelly 30°F — Best for Versatile Camping Setups
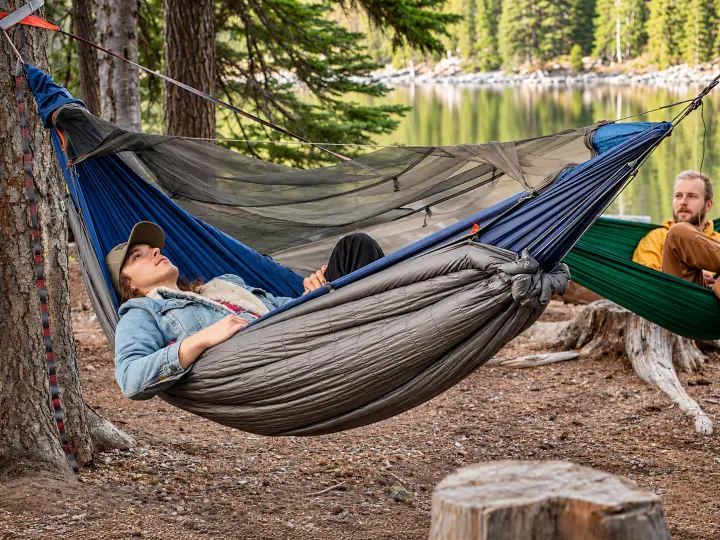
The Kammok Firebelly 30°F is more versatile than a conventional dedicated underquilt.
It can function as a hammock underquilt, top quilt, camp blanket, or minimalist sleeping bag-style quilt.
That flexibility makes it appealing for campers who alternate between hammock camping and ground-based sleeping systems.
The Firebelly uses 750-fill-power DownTek-treated duck down, offering a balance between warmth and compressibility.
Its 30°F rating places it between lightweight summer underquilts and more heavily insulated three-season options.
The quilt weighs approximately 28.2 ounces, while the complete packaged system is heavier because it includes storage and conversion accessories.
An underquilt conversion kit is included, allowing you to adapt the quilt for use beneath a hammock.
Why it makes sense:
- Multiple configurations for different camping setups.
- Down insulation offers good compressibility.
- Included conversion accessories add flexibility.
- Useful for campers who don’t want a separate quilt for every sleeping system.
What to consider: The Firebelly can’t function as both your top quilt and underquilt at the same time.
If you’re using it beneath your hammock, you’ll still need suitable insulation above your body.
It’s also heavier than some specialized down underquilts, so versatility comes with a weight tradeoff.
Best for: Campers who alternate between hammock sleeping, backpacking, and conventional camping and want equipment that serves multiple purposes.
Check the Kammok Firebelly 30°F
Enlightened Equipment Revolt V2 — Best for Lightweight Backpacking
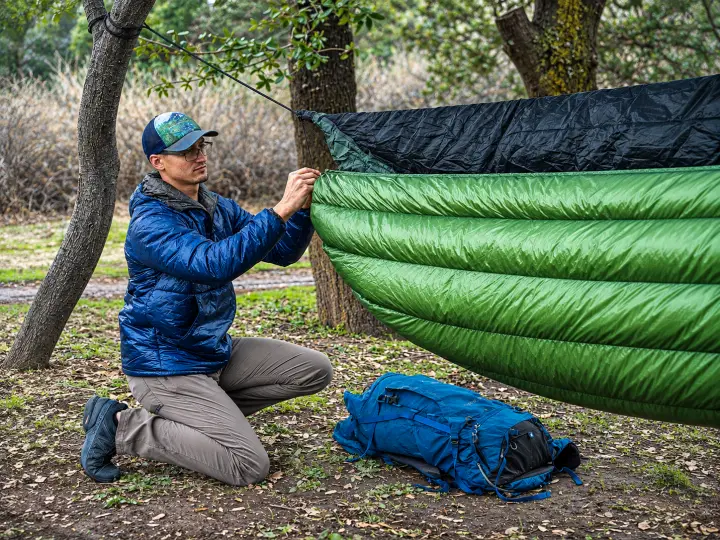
The Enlightened Equipment Revolt V2 Underquilt is designed specifically for hammock insulation.
It offers customizable warmth and sizing without the extra features required to convert into a sleeping bag or camp blanket.
The Revolt V2 uses down insulation with vertical baffles and a differential-cut design.
The differential cut allows the outer fabric to accommodate the insulation’s loft while the inner fabric follows the hammock’s shape. This helps the down remain lofted when the quilt is fitted snugly.
Its adaptable suspension system is designed for a wide range of hammocks.
Available configurations include:
- Temperature ratings from 50°F down to 0°F
- 850- or 950-fill-power down
- Short 55-inch and regular 80-inch lengths
The 55-inch version is intended for partial coverage, with additional insulation needed beneath the lower legs and feet.
The 80-inch version offers full-body coverage for many sleepers.
Weight depends on the selected temperature rating, size, fill power, and fabric configuration.
That means the lightest available version isn’t necessarily the right one for cold-weather backpacking.
Why it makes sense:
- Down insulation offers excellent packability.
- Multiple temperature options let you avoid unnecessary insulation.
- Short and full-length configurations accommodate different priorities.
- Adjustable suspension helps fine-tune the fit.
- Dedicated underquilt construction emphasizes hammock performance.
What to consider: The Revolt V2 costs more than basic synthetic underquilts, and choosing the best configuration requires careful consideration.
A lightweight short version may save ounces, but it also creates the need for separate foot insulation.
For colder trips, the full-length configuration may provide a better balance of comfort and convenience.
Best for: Frequent hammock backpackers, weight-conscious hikers, and campers who want to build a more specialized sleep system.
Check the Enlightened Equipment Revolt V2 Underquilt
Which Hammock Underquilt Is Right for You?
If you’re still deciding between different types, start with the way you actually camp.
You don’t need to pay for features that won’t improve your trips.
| Your camping style | Recommended setup | Why |
|---|---|---|
| Summer hammock camping | 40°F synthetic, full-length | Comfortable coverage without premium down pricing |
| Three-season camping | 20–30°F full-length | Useful warmth across changing temperatures |
| Budget-conscious camping | Synthetic underquilt or existing insulated pad | Lower cost, with some weight or comfort tradeoffs |
| Lightweight backpacking | Down, partial-length or lightweight full-length | Better warmth-to-weight and packability |
| Cold-weather hammock camping | 0–20°F full-length, matched to conditions | More insulation and fewer exposed areas |
| Mixed hammock and tent camping | Convertible quilt or insulated pad | More versatility across sleeping setups |
The Best Value Depends on How Often You Camp
If you only use a hammock a few nights each summer, a synthetic underquilt—or an insulated sleeping pad you already own—may be all you need.
For someone who regularly camps in spring and fall, spending more on a warmer full-length underquilt can be worthwhile because it expands the conditions where hammock camping remains comfortable.
For backpackers who carry their equipment over long distances, paying more for down insulation can be justified by the reduced weight and packed volume.
Don’t pay for a lighter underquilt unless the weight savings matter to your trips. Don’t save money on a lighter temperature rating if it leaves you cold.
That’s the balance that makes an underquilt a good value.
How to Set Up a Hammock Underquilt Without Cold Spots
Even a well-insulated underquilt can feel cold if the suspension isn’t adjusted properly.
Most problems come from loose suspension, gaps at the ends, or insulation compressed too tightly against the hammock.
Step 1: Attach the Underquilt Beneath Your Hammock
Hang your hammock at its normal sleeping angle.
Attach the underquilt using its designated clips, carabiners, hooks, or shock cords.
Position it beneath the area where your body will rest.
Avoid tightening everything completely before getting inside.
Step 2: Adjust the Main Suspension
Gently increase the suspension tension until the underquilt follows the hammock’s underside.
You want the quilt to stay close to the hammock without flattening its insulation.
If the quilt hangs several inches below the hammock when you’re inside, warm air may escape through the gap.
Step 3: Close Gaps Around Your Shoulders and Feet
Many underquilts have adjustable end channels or tension controls.
Use these to reduce openings that allow cold air to move between the hammock and quilt.
Don’t pull them so tightly that they distort the quilt or compress the insulation.
Step 4: Test Your Normal Sleeping Position
Get inside the hammock and lie the way you normally sleep.
If you prefer a diagonal position, test the quilt that way.
Check whether the insulation remains underneath your shoulders, hips, and lower body.
Cold spots along one side often indicate that the quilt needs to be repositioned rather than tightened.
Step 5: Recheck Before Sleeping
Once you’ve settled into the hammock, confirm that the quilt remains centered and the insulation isn’t compressed.
A few small adjustments can make a noticeable difference when nighttime temperatures drop.
Common Hammock Underquilt Mistakes to Avoid
Buying a good underquilt is only part of building a comfortable hammock sleep system.
These mistakes can leave you cold even when the insulation itself is appropriate.
Choosing a rating too close to the forecast low. Temperature ratings aren’t universal comfort guarantees. Leave some margin, particularly if you sleep cold.
Assuming a warm sleeping bag eliminates the need for bottom insulation. Compressed insulation beneath your body offers much less protection against heat loss.
Hanging the underquilt too loosely. Large air gaps let moving air carry warmth away.
Overtightening the suspension. Flattening insulation reduces its ability to retain warm air.
Choosing a partial-length quilt without foot insulation. A lighter quilt isn’t much help if your feet become uncomfortably cold.
Ignoring hammock compatibility. A quilt that fits poorly may develop gaps even when it has sufficient insulation.
Storing insulation tightly compressed. Long-term compression can affect loft, especially with synthetic fills. Follow the manufacturer’s storage instructions and let the quilt dry thoroughly before storage.
Frequently Asked Questions About Hammock Underquilts
Do You Need Both an Underquilt and a Sleeping Bag?
For cool-weather hammock camping, you generally need insulation above and below your body.
An underquilt protects the underside of the hammock, while a sleeping bag or top quilt insulates your upper body.
An insulated sleeping pad can replace the underquilt, but a sleeping bag alone may leave you cold underneath because its insulation gets compressed.
Is a 20°F Underquilt Too Warm for Summer?
Not necessarily.
Many underquilts can be loosened or partially vented when temperatures are warmer.
However, a 20°F model is generally heavier and bulkier than a quilt intended for mild summer nights.
If you rarely camp below 45°F or 50°F, a 40°F underquilt may be more practical.
Can You Use an Underquilt With Any Hammock?
Not always.
Many conventional gathered-end hammocks work with general-purpose underquilts, but bridge hammocks, spreader-bar designs, and specialty models may require different suspension systems or quilt shapes.
Check the manufacturer’s compatibility guidance before purchasing.
Does an Underquilt Need to Touch the Hammock?
It should fit closely enough to prevent unwanted air circulation without compressing its insulation.
A large gap can allow drafts, while excessive tension may flatten the quilt.
The ideal fit depends on the quilt’s construction and suspension system.
Can a Hammock Underquilt Get Wet?
Yes, and moisture can reduce insulation performance.
Synthetic insulation generally retains more warmth when damp than untreated down.
Water-resistant down treatments improve moisture tolerance but don’t eliminate the need to keep your quilt dry.
A properly pitched tarp is important in wet weather, regardless of insulation type.
Is a Hammock Underquilt Worth Buying for Car Camping?
If you regularly sleep in a hammock, an underquilt can be a worthwhile upgrade.
Because weight and packed size are less important for car camping, you can prioritize full-length coverage, easy setup, and affordability.
A synthetic model often offers particularly good value.
Final Verdict: Which Hammock Underquilt Should You Buy?
For most hammock campers, a full-length underquilt rated for the coldest nights they realistically expect is the best place to start.
The ENO Ember is a practical option for beginners and mild-weather trips, while the Kammok Firebelly offers flexibility for campers who use different sleeping setups.
For frequent backpackers who want more control over warmth, weight, and coverage, the Enlightened Equipment Revolt V2 is worth considering.
You don’t need the most expensive underquilt to stay warm. You need enough insulation, the right coverage, and a suspension system that fits your hammock properly.
Get those three things right, and you’ll spend a lot less time worrying about a cold back—and a lot more time enjoying a comfortable night outdoors.
Affiliate Disclosure: GearForTheOutdoors.com participates in affiliate programs, including REI, Amazon, REI Outlet, Garage Grown Gear, evo, and other trusted partners. When you purchase through our links, we may earn a small commission at no extra cost to you. That helps support our content and keeps our recommendations useful, practical, and free.
Disclaimer: This post is for informational purposes only. Always verify current product details, fit, compatibility, availability, safety information, and manufacturer instructions before purchase or use. Outdoor conditions and gear performance can vary depending on setup, weather, terrain, vehicle, and experience level.