A good van life solar setup is not really about chasing the biggest panel or the most impressive spec sheet. It is about keeping the small parts of road life running smoothly: cold food in the fridge, lights after sunset, a charged phone, a working fan on warm nights, and enough laptop power when the road also has to double as an office.
That is where solar panels matter. They are the quiet part of a van build that can make the whole setup feel easier, more independent, and less tied to campground hookups or engine idling. Park somewhere sunny, angle the rig well, and a properly sized solar system can quietly refill the battery bank while the day unfolds. ☀️
Choosing the best solar panels for van life can feel confusing at first because the products all sound similar. Rigid panels, flexible panels, portable briefcase panels, monocrystalline cells, wattage ratings, efficiency numbers, roof dimensions, charge controllers — it adds up fast.
The key is to start with how the van will actually be used. A weekend camper with a small power station does not need the same solar array as a full-time van lifer running a fridge, vent fan, Starlink, laptops, cameras, and an induction cooktop. A stealthy city build has different needs than a rugged overland van bouncing down washboard roads.
This guide breaks it down in plain language. You will find the strongest solar panel types for different van life setups, what the specs actually mean, and which options make the most sense for real-world use in 2026.
Our Top Van Life Solar Panel Picks at a Glance
Need a fast starting point? These are the solar panel styles and products that make the most sense for most camper van builds, from simple weekend setups to more capable off-grid rigs.
| Panel | Best For | Type | Wattage | Price Tier |
|---|---|---|---|---|
| Renogy 100W 12V Monocrystalline Panel | Overall Value | Rigid | 100W | $$ |
| Renogy 100W Flexible Monocrystalline Panel | Curved Roofs & Stealth | Flexible | 100W | $$–$$$ |
| Zamp Solar Obsidian 100W Panel | Durability & Low Profile | Rigid | 100W | $$$$ |
| Rich Solar MEGA 200W 12V Panel | High Power Needs | Rigid | 200W | $$$ |
| Goal Zero Boulder 100 Briefcase | No-Install Simplicity | Portable | 100W | $$$ |
How to Choose Solar Panels for Your Van
Before comparing specific panels, it helps to understand what actually matters on a van roof. Solar panels are not one-size-fits-all. The right choice depends on roof space, travel style, battery capacity, budget, and how much power the setup needs on a normal day.
A van that mostly camps in sunny desert regions can get away with a different setup than one that spends weeks in the Pacific Northwest. A rig with a roof vent, cargo box, surfboards, or rooftop deck may have less solar real estate than expected. And a portable panel can make more sense than a permanent install if the van often parks in shade. 🌲
Types of Van Life Solar Panels
Your first major decision is the physical style of the panel. For van life, most setups fall into three categories: rigid panels, flexible panels, and portable or suitcase-style panels.
- Rigid Panels: These are the classic solar panels most people picture first. They use solar cells protected by tempered glass and supported by an aluminum frame.
- Pros: Durable, long-lasting, usually the best value per watt, and better suited for permanent roof-mounted systems.
- Cons: Heavier, more visible, and typically require brackets, rails, or a more involved mounting system.
Rigid panels are usually the safest pick for a serious van build. They tend to handle heat, vibration, weather, and long-term exposure better than flexible panels. The small air gap under a mounted rigid panel also helps with cooling, which can improve performance on hot days.
- Flexible Panels: These panels are thin, lightweight, and designed to bend slightly to match curved or uneven surfaces.
- Pros: Lightweight, low-profile, easier to hide, and useful for curved roofs, pop-tops, fiberglass shells, or stealth-focused builds.
- Cons: Shorter lifespan than rigid panels, more vulnerable to heat buildup, and easier to damage if stepped on or installed poorly.
Flexible panels can be a smart solution when a rigid panel simply will not fit well. They are especially appealing on vans where height, roof shape, or visual stealth matters. The tradeoff is durability. For long-term full-time travel, they usually need more careful installation and more realistic expectations.
- Portable/Suitcase Panels: These foldable panels are not permanently attached to the van. They are stored inside and set up outside when parked.
- Pros: No roof installation, easy to aim toward the sun, useful when the van is parked in shade, and great for portable power stations.
- Cons: Must be set up and packed away, can be stolen if left unattended, and take up interior storage space.
Portable panels work especially well for weekend campers, renters, small vans, and anyone using a power station instead of a full custom electrical system. They are also useful as a supplemental panel for roof-mounted systems.
Key Specs Explained
- Wattage (W): Wattage tells you how much power a panel can produce under ideal test conditions. A 100W panel does not produce 100 watts every hour of the day. Real output depends on sun angle, clouds, shade, temperature, wiring, and charge controller efficiency. For many vans, 200W to 400W is a common starting range.
- Cell Type: For van life, monocrystalline panels are usually the best choice. They are more efficient than older polycrystalline panels, which matters when roof space is limited. Monocrystalline panels also tend to perform better in variable light and are now the standard for most quality mobile solar setups.
- Efficiency: Efficiency measures how well the panel converts sunlight into electricity. Higher efficiency can help when roof space is tight. That said, efficiency should not be the only factor. A durable 100W panel that fits well and lasts for years may be more useful than a slightly more efficient panel that is awkward to mount.
- Voltage: Most van life panels are designed to work with 12V battery systems, though the panel’s actual operating voltage will usually be higher so it can charge through a solar charge controller. Always make sure the panel, charge controller, battery, and wiring are compatible.
- Dimensions & Weight: This is where a lot of van solar plans get real very quickly. Roof vents, fans, AC units, cargo boxes, roof racks, skylights, and antennas can eat up space fast. Measure the roof before buying panels, not after. Leave room for airflow, wiring access, and future maintenance.
- Mounting Style: Roof-mounted rigid panels need brackets, rails, or rack mounting. Flexible panels are often installed with adhesive or tape, though heat management is important. Portable panels need storage space and a safe place to set up when parked.
The Best Solar Panels for Van Life in 2026
The panels below were chosen for practical van life use: availability through common affiliate-friendly retailers, real-world usefulness, value, durability, and fit for different types of builds.
Renogy 100W 12V Monocrystalline Panel
Best For: Overall Value & First-Time Builders
The Renogy 100W 12V Monocrystalline Panel remains one of the easiest solar panels to recommend for DIY van builds because it solves the biggest problem most beginners have: getting dependable solar on the roof without overcomplicating the system.
A 100W rigid panel is small enough to fit into many roof layouts, light enough for most DIY installs, and simple enough to scale. One panel can support a very basic power setup. Two or three can become the foundation for a more capable weekend or part-time van life system. For many builders, that modularity is the real advantage.
The rigid aluminum frame and glass face make it better suited for long-term roof mounting than most flexible panels. It also works well for people who want to learn the basics of solar without starting with an expensive custom setup. Add a quality charge controller, correct wiring, proper fusing, and a well-sized battery, and this kind of panel can become a very dependable part of the electrical system. 🔋
The biggest thing to remember is that 100W is not a magic number. One panel may be enough for light charging, LED lights, and occasional device use. For a fridge, fan, and daily electronics, most vans will need more than one.
| Spec | Value |
|---|---|
| Type | Rigid, Monocrystalline |
| Wattage | 100 Watts |
| Efficiency | Varies by current model |
| Dimensions | Varies by current model |
| Weight | Varies by current model |
| Warranty | Check current manufacturer listing before purchase |
Pros:
- Strong value for a beginner-friendly van solar setup
- Rigid construction is better for long-term roof mounting
- Easy to scale by adding additional panels
- Widely used in RV, van, cabin, and off-grid systems
- Good starting point for DIY builders learning solar basics
Cons:
- One 100W panel may not be enough for a fridge-heavy van setup
- Multiple panels require more roof space and more wiring planning
- Rigid frame is bulkier than flexible panel options
Who It’s Best For: DIY van builders, weekend travelers, budget-conscious campers, and anyone building a simple but expandable solar system.
Who Should Skip It: Anyone with very limited roof space, a curved roof that cannot accept rigid panels, or a high-power setup that would be cleaner with larger 200W panels.
Renogy 100W Flexible Monocrystalline Panel
Best For: Curved Roofs & Stealth Camping
A flexible solar panel makes sense when a traditional rigid panel does not fit the shape or style of the build. The Renogy 100W Flexible Monocrystalline Panel is a better fit for curved van roofs, fiberglass surfaces, pop-top campers, small trailers, and low-profile builds where bulky roof hardware is not ideal.
The biggest advantage is weight and profile. Flexible panels sit much closer to the roof, which helps preserve a cleaner silhouette. That matters for stealthier urban camping, garage clearance, and builds where every inch of roof height counts.
The tradeoff is long-term durability. Flexible panels are more sensitive to heat, impact, and poor installation. When they are glued directly to a roof with no airflow, heat can build up underneath and reduce output over time. They also should not be treated like a walking surface, even if they feel sturdy at first. A little care during installation goes a long way here. ⚙️
This type of panel is not automatically “better” than rigid solar. It is better for a specific kind of van: one where shape, weight, and visibility matter more than maximum lifespan.
| Spec | Value |
|---|---|
| Type | Flexible, Monocrystalline |
| Wattage | 100 Watts |
| Efficiency | Varies by current model |
| Dimensions | Varies by current model |
| Weight | Lighter than most rigid 100W panels |
| Warranty | Check current manufacturer listing before purchase |
Pros:
- Lightweight and low-profile
- Better for curved roofs, pop-tops, and stealth-style builds
- Can be easier to place where rigid panels do not fit
- Useful for smaller vans and compact roof layouts
Cons:
- Usually less durable than rigid panels
- More vulnerable to heat buildup
- Easier to damage from pressure, debris, or poor mounting
- Not ideal for people who want a “buy once, use for years” roof setup
Who It’s Best For: Van lifers with curved roofs, pop-top campers, stealth builds, and smaller rigs where weight and profile are more important than maximum durability.
Who Should Skip It: Full-time travelers who want the longest lifespan possible, off-road vans that see a lot of vibration and debris, or anyone who can easily fit rigid panels instead.
Zamp Solar Obsidian Series 100W Panel
Best For: Maximum Durability & Low-Profile Mounting
The Zamp Solar Obsidian Series 100W Panel is the premium pick in this guide. It is designed for people who care less about the lowest cost per watt and more about build quality, roof profile, and long-term confidence.
This is the kind of panel that makes sense on a serious van, overland rig, teardrop trailer, or camper where the solar system needs to handle road vibration, weather, and long-term exposure. The Obsidian line is known for its slim profile and rugged construction, making it especially appealing when a clean roof setup matters.
The price is the main downside. A budget solar setup can deliver more watts for less money, especially with standard rigid panels. But the Zamp panel earns attention for travelers who prefer a polished, durable, low-profile system and do not want to piece together the cheapest possible setup.
For rougher roads, long trips, and higher-end builds, this is the “pay more for confidence” option. It will be overkill for some weekend campers, but it makes a lot of sense for vans that spend real time away from easy replacement parts and predictable conditions. 🏜️
| Spec | Value |
|---|---|
| Type | Rigid, Monocrystalline |
| Wattage | 100 Watts |
| Efficiency | High-efficiency monocrystalline design |
| Dimensions | Varies by current kit or panel version |
| Weight | Varies by current kit or panel version |
| Warranty | Check current manufacturer listing before purchase |
Pros:
- Premium low-profile design
- Strong choice for rugged van and overland builds
- More durable than most flexible panel options
- Cleaner roof appearance than many standard framed panels
- Good fit for travelers who prioritize quality over lowest price
Cons:
- More expensive than many 100W solar panels
- Lower watt-per-dollar value than budget panels
- May be unnecessary for occasional weekend use
Who It’s Best For: Full-time van lifers, overlanders, premium camper builds, and anyone who wants a strong low-profile rigid panel without going flexible.
Who Should Skip It: Budget builders, casual weekend campers, or anyone trying to maximize watts per dollar.
Rich Solar MEGA 200W 12V Monocrystalline Panel
Best For: High Power Needs & Limited Roof Space
A 200W panel can simplify a van solar setup because it delivers more power from fewer physical panels. Instead of mounting and wiring several small panels, one larger panel can provide a cleaner path to a stronger array.
The Rich Solar MEGA 200W 12V Monocrystalline Panel is a practical option for van lifers who know they need more than a basic weekend setup. If the van has a compressor fridge, vent fan, camera gear, laptops, portable internet, or a larger battery bank, 200W becomes a more useful building block than 100W.
The main benefit is roof efficiency. One 200W panel can be easier to plan around than two smaller panels, depending on roof shape and obstacles. It may also reduce the number of mounting points and simplify the wiring layout. For many vans, two 200W panels create a capable 400W system that feels much more realistic for extended off-grid camping.
The downside is size. A larger panel can be harder to install alone, and partial shade can have a bigger impact if one large panel is doing most of the work. Roof layout matters here. A vent fan shadow, roof box, or nearby tree branch can reduce output more than expected.
| Spec | Value |
|---|---|
| Type | Rigid, Monocrystalline |
| Wattage | 200 Watts |
| Efficiency | Varies by current model |
| Dimensions | Varies by current model |
| Weight | Heavier than most 100W panels |
| Warranty | Check current manufacturer listing before purchase |
Pros:
- Strong 200W output from a single panel
- Good choice for larger battery banks and higher daily power needs
- Can simplify wiring compared with multiple smaller panels
- Useful for vans with enough open roof space
- Good balance of power and value
Cons:
- Larger panel can be harder to mount
- Less flexible for awkward roof layouts
- Partial shading can reduce output more noticeably
- May be too large for compact vans with fans, racks, or storage boxes
Who It’s Best For: Van lifers with bigger electrical demands, larger batteries, full-time travel plans, or enough roof space to make a 200W panel fit cleanly.
Who Should Skip It: Small van owners, anyone with a crowded roof, or builders who prefer smaller modular panels for more flexible placement.
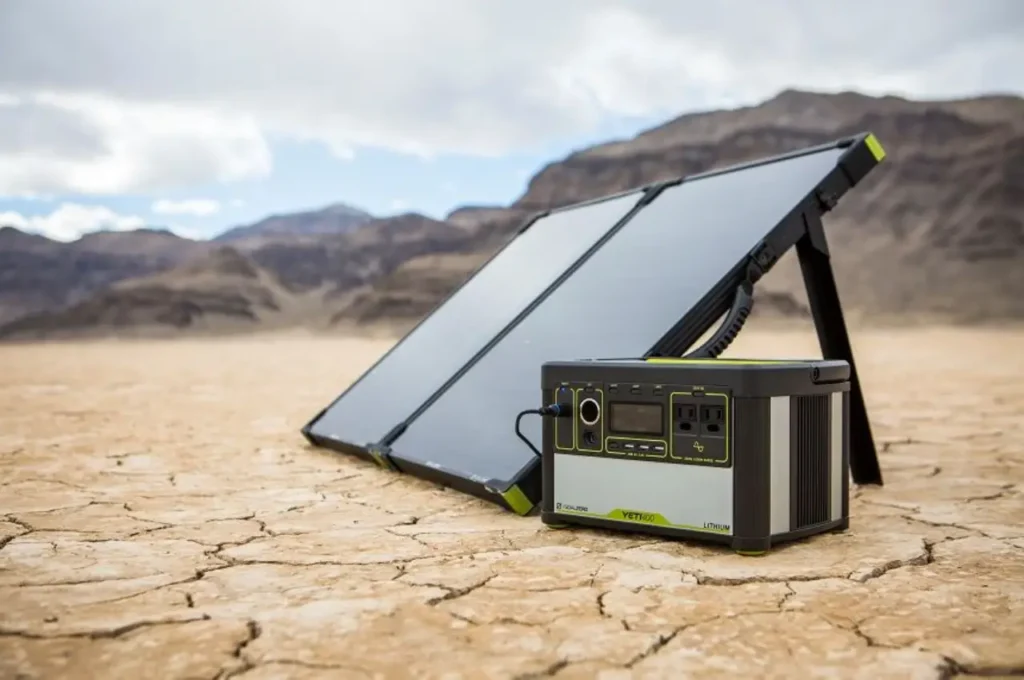
Goal Zero Boulder 100 Briefcase Solar Panel
Best For: Simplicity, Portability, & No Permanent Install
The Goal Zero Boulder 100 Briefcase is the easiest solar option in this guide for anyone who does not want to drill into a roof, design a permanent mounting system, or commit to a full van electrical build right away.
It folds like a suitcase, stores inside the van, and sets up at camp with an integrated kickstand. The big advantage is sun positioning. A flat roof-mounted panel only works with the angle it has. A portable briefcase panel can be moved throughout the day, aimed directly at the sun, and placed away from the shade if the van is parked under trees.
That flexibility is especially useful at campgrounds, dispersed campsites, and shoulder-season trips when sun angle matters more. It also pairs naturally with portable power stations, especially for campers who want a simple plug-and-play setup instead of a hardwired battery bank. REI lists the Goal Zero Boulder 100 Briefcase as a 100-watt monocrystalline/glass/aluminum foldable panel with an integrated kickstand and protective carrying bag.
The tradeoff is convenience. Portable panels must be pulled out, positioned, watched, and packed away. They also take up storage space and should not be left unattended in busy areas. For some travelers, that is a small price to pay for avoiding permanent installation. For others, it becomes one more camp chore.
| Spec | Value |
|---|---|
| Type | Portable, Monocrystalline |
| Wattage | 100 Watts |
| Dimensions | Foldable briefcase design |
| Weight | About 25 lbs. 14.4 oz. according to REI’s current listing |
| Warranty | Check current retailer/manufacturer listing before purchase |
Pros:
- No permanent installation required
- Can be angled toward the sun for better charging
- Good pairing for portable power stations
- Useful when the van is parked in shade
- Works for van camping, car camping, basecamp, and emergency backup
Cons:
- Must be set up and packed away
- Takes up interior storage space
- Not ideal to leave unattended
- Heavier than some lightweight portable solar options
Who It’s Best For: Weekend campers, car campers, renters, power station users, and anyone who wants solar charging without a roof install.
Who Should Skip It: Full-time van lifers who want automatic charging every day, anyone with limited interior storage, or travelers who do not want to manage loose gear at camp.
Your Step-by-Step Guide to Choosing the Right Panels
The best solar panel is not the one with the biggest number on the box. It is the one that matches the van, the battery, the daily routine, and the kind of places the rig will actually go.
Use this process before buying.
Step 1: Conduct a Power Audit
Start by listing every device that will use power inside the van.
Common van life power draws include:
- Lights
- 12V fridge or powered cooler
- Vent fan
- Water pump
- Phones
- Laptops
- Cameras
- Drone batteries
- Starlink or mobile router
- Heated blanket
- Blender
- Induction cooktop
- Electric kettle
- Portable power station
- Medical devices, if needed
For each item, estimate two things: how many watts it uses and how many hours per day it runs. Multiply watts by hours to get watt-hours.
For example, a 45W fridge running on and off throughout the day may use a few hundred watt-hours in 24 hours, depending on temperature, insulation, and how often it opens. A laptop may use much more power during workdays than it does on weekend trips.
This step does not need to be perfect. It just needs to be honest. Most solar mistakes happen because the system is built around a dream version of power use, not the actual daily routine.
Step 2: Size Your Solar Array
Once the daily watt-hour estimate is clear, match it to expected sun conditions.
A simple rule of thumb is:
Daily watt-hours ÷ peak sun hours = target solar wattage
If a van uses around 1,200Wh per day and gets about 4 useful peak sun hours, a 300W solar array is a reasonable starting point:
1,200Wh ÷ 4 hours = 300W
That does not mean 300W will be perfect every day. Clouds, shade, winter sun, smoke, dust, heat, and poor panel angle can reduce output. If the van will spend time in cloudy regions, forests, or winter conditions, build in more margin. 🌧️
Step 3: Measure Your Roof
This step deserves more attention than most people give it.
Before buying panels, measure the actual usable roof space. Account for:
- Vent fans
- Skylights
- Roof racks
- Cargo boxes
- AC units
- Antennas
- Surfboards or paddleboards
- Awning mounts
- Curved roof edges
- Walking or maintenance access
- Shading from nearby roof accessories
Sketch the roof layout and compare it against panel dimensions. Leave room for airflow under rigid panels, wiring routes, and access for cleaning or maintenance. A panel that technically fits but is constantly shaded by a vent fan may not perform the way the specs suggest.
Step 4: Match the Panel Type to the Travel Style
Different van life setups call for different solar choices.
- Weekend Camper: A portable 100W panel or a simple 100W–200W roof setup may be enough, especially with a portable power station.
- Part-Time Road Tripper: A 200W–300W roof setup is a more comfortable range for a fridge, lights, fan, and regular device charging.
- Full-Time Van Lifer: A 300W–600W system is more realistic, especially with laptop work, Starlink, cameras, or longer off-grid stays.
- Stealth Urban Camper: Flexible or low-profile panels can help keep the roof cleaner and less noticeable.
- Off-Road Traveler: Durable rigid panels and strong mounts should take priority over the lowest price.
- Shade-Loving Camper: A portable panel can be a smart supplement because it can sit in the sun while the van stays cooler under trees.
Step 5: Do Not Forget the Rest of the System
Solar panels are only one part of a van electrical setup. To actually use that power safely, the system also needs the right supporting components.
That may include:
- Solar charge controller
- Battery bank
- Correct gauge wiring
- Fuses or breakers
- Roof entry gland
- Mounting hardware
- Battery monitor
- Inverter, if using AC appliances
- Portable power station, if using an all-in-one setup
A great solar panel connected to an undersized battery or mismatched controller will not solve the problem. The system works best when every piece is sized together.
Final Thoughts
Choosing the best solar panels for van life is really about choosing the right kind of freedom.
For some people, that means a simple portable panel that charges a power station on weekend trips. For others, it means a serious roof-mounted array that can keep a fridge cold, laptops charged, and lights running for days away from hookups.
For most DIY van builders, the Renogy 100W 12V Monocrystalline Panel is still one of the most practical starting points. It is simple, scalable, and budget-friendly. For curved roofs or stealthier setups, the Renogy 100W Flexible Panel is easier to fit where rigid panels do not work. For more demanding builds, the Rich Solar MEGA 200W Panel can help build a stronger system with fewer panels. And for no-drill simplicity, the Goal Zero Boulder 100 Briefcase is still one of the cleanest portable options.
The right solar setup should make travel feel calmer, not more complicated. Measure the roof, calculate the daily power needs, leave room for less-than-perfect weather, and choose panels that match the way the van will actually be used. A well-planned solar system quietly does its job in the background — which is exactly what good van gear should do. ⚡
Frequently Asked Questions
How many solar panels do I need for my van?
Most camper vans do well with 200W to 400W of solar for a practical everyday setup, but the right number depends on power use. A small weekend setup with lights, phones, and a power station may be fine with one 100W portable panel. A van with a fridge, fan, laptop charging, camera batteries, and regular off-grid use may need 300W or more.
The best starting point is a power audit. Add up the watt-hours used by the fridge, lights, fan, devices, and other electronics in a typical day. Then size the solar array around that number and the amount of sun expected in the places the van will travel.
Is 100W solar enough for van life?
A single 100W solar panel can be enough for very light use, but it is usually not enough for a full van life electrical system. It can help charge phones, lights, small devices, or a compact power station. It may also work for minimal weekend camping.
For a 12V fridge, vent fan, laptops, and daily charging, 100W will often feel limited. Many practical van setups start closer to 200W or 300W, especially if the van camps away from hookups.
Is 200W solar enough for a camper van?
A 200W solar setup can be a solid entry point for a camper van with moderate power needs. It may support a fridge, lights, fan, and device charging if the battery bank is sized well and the van gets good sun.
However, 200W can feel tight for full-time work-from-the-road setups, Starlink use, induction cooking, or long cloudy stretches. For more power-hungry rigs, 300W to 600W is often more comfortable.
Can I walk on flexible solar panels?
No. Flexible solar panels should not be treated as walking surfaces. Even if a panel feels firm, pressure from feet, knees, or gear can damage the cells and reduce performance.
Some flexible panels may be described as semi-flexible or durable, but that does not mean they are designed for regular foot traffic. Install them in places where they are protected from pressure and avoid placing heavy items on top of them.
Do solar panels work on cloudy days?
Yes, solar panels still work on cloudy days, but output drops significantly. Heavy overcast conditions can reduce production to a small fraction of the panel’s rated wattage.
This is why battery capacity matters. Solar panels refill the system, but the battery bank carries the van through cloudy days, shaded campsites, and nighttime use. If the van will spend a lot of time in cloudy regions, size the battery and solar array with extra margin.
What is better for van life: rigid or flexible solar panels?
Rigid solar panels are usually better for durability, long-term performance, and value. They are the better choice for most permanent van roof installations.
Flexible panels are better when roof shape, low profile, weight, or stealth matters more. They work well on curved roofs, pop-tops, and builds where a rigid panel would be awkward. The tradeoff is that flexible panels usually do not last as long and need more careful installation to manage heat.
Are portable solar panels good for van life?
Portable solar panels can be excellent for van life, especially for weekend campers, renters, small vans, and portable power station users. They are easy to aim at the sun and do not require drilling into the roof.
The downside is that they need to be set up and packed away. They also take up storage space and should not be left unattended in busy campsites or public areas. For full-time van life, portable panels work best as a supplement rather than the only charging method.
What is the difference between monocrystalline and polycrystalline solar panels?
Monocrystalline panels are made from a single silicon crystal structure and are generally more efficient. They are usually the better choice for van life because roof space is limited.
Polycrystalline panels are typically less efficient and need more surface area to produce the same amount of power. They can still work in some applications, but for most camper vans, monocrystalline panels are the better fit.
How long do van solar panels last?
Rigid solar panels can last many years, and many come with long power output warranties. Flexible panels usually have a shorter practical lifespan because they are more exposed to heat stress, bending, surface damage, and installation issues.
Real-world lifespan depends on panel quality, mounting method, climate, road vibration, cleaning, and how much abuse the roof sees. A well-mounted rigid panel generally has the best chance of lasting the longest.
Do I need a charge controller for van solar panels?
Yes, most solar panel setups need a charge controller between the panels and the battery. The charge controller regulates incoming solar power so the battery charges safely.
Some portable solar kits and power stations already include built-in charge control or require specific connectors. Always check compatibility before connecting a panel directly to a battery or power station.
Affiliate Disclosure: GearForTheOutdoors.com participates in affiliate programs, including REI, Amazon, REI Outlet, Garage Grown Gear, evo, and other trusted partners. When you purchase through our links, we may earn a small commission at no extra cost to you. That helps support our content and keeps our recommendations useful, practical, and free.
Disclaimer: This post is for informational purposes only. Always verify current product details, fit, availability, safety information, and manufacturer warranties before purchase or use. Outdoor conditions and gear performance can vary depending on setup, weather, terrain, and experience level.